In Pokémon Arena 2D, a move name alone does not tell you whether pressing its key is a good decision. Both fighters move at once. The attack has a shape, a direction, a range, a wind-up, a cooldown, and limited PP. The target has one or two types, and the arena may put cover between you. This guide gives you a short decision order you can use while the match is running. It applies to the browser game linked from this site, not to other games with similar names.
The five-second check: read the opponent's type chips, find an open route, face the route, choose a move that reaches it, and decide where you will stand after the attack. If the clock or enemy pressure gives you less time, prioritize the first cause that can make the attack worthless: an immunity or a solid block. Then take the simplest safe action you can read clearly.
First, identify what the move does in space
The original game's move overview groups its attacks into five broad shapes. These are practical questions to ask about the four cards in front of you, not a ranking of which shape is strongest:
- Projectile: Is the lane open all the way to the target? A traveling shot such as Flamethrower, Thunderbolt, or Ice Beam can be intercepted by cover and gives a distant opponent time to move. Start with a clear middle-distance test, then shorten or rotate if it repeatedly passes behind the target.
- Beam: Can you line up the narrow path before the attack becomes active? Solar Beam, Hyper Beam, and Zap Cannon are examples in the source overview. Watch the wind-up and aim at the route the enemy is committed to, rather than pressing from a blocked or rapidly changing angle.
- Melee: Can you reach the opponent and still leave the exchange? Dragon Claw, Close Combat, and Mach Punch are source examples. Approach after the enemy has committed to an attack or crossed a cover edge. If you cannot name an exit, use movement to improve the approach before spending the move.
- Pulse: Is the opponent close enough to enter the area around you? The source groups Earthquake, Surf, and Sludge Wave here. A pulse answers a nearby approach better than a distant target. Test its visible radius once; do not assume every wide-looking effect reaches the whole arena.
- Self-targeted move: Do you have time to recover or improve a stat without an immediate hit? Calm Mind, Swords Dance, and Recover are source examples. Use cover or distance to make that pause safer, then check whether the effect actually changed your next exchange.
Move cards and effects in the live game are the final reference for a particular creature. A move name from this list does not mean your currently selected fighter owns it. Read the four cards after every switch.
Then check type, cover, timing, and PP
Work through these questions in order. You can answer them from the battle HUD and field without memorizing damage formulas.
- Type: Read both opponent type chips. The source game uses effectiveness that can double, halve, or nullify damage, along with a same-type bonus. An immunity is more urgent than a small advantage: do not spend another charge of an attack that cannot damage this target.
- Cover: Trace the attack's likely line. If a block sits between the two fighters, move to a side before firing a direct projectile or beam. The same block can protect you while you wait for an opening.
- Timing: Watch whether the target is walking freely, beginning an attack, or recovering. A long-range shot at a freely strafing target asks more of your aim than a shorter shot into a committed route. A slower move needs a more secure opening.
- Resources: Check the card's PP and whether it is cooling down. PP is the limited supply; cooldown is the wait between uses. If a card does not activate, distinguish an empty slot from a temporary wait before repeatedly pressing it.
This is a decision order, not a rule that every attack must deal damage. A shot may be worth PP if it forces the opponent away from a safe lane or helps break cover. Name that purpose before you fire so you can tell afterward whether the spend was useful.
Screenshot case: Charizard facing Swampert
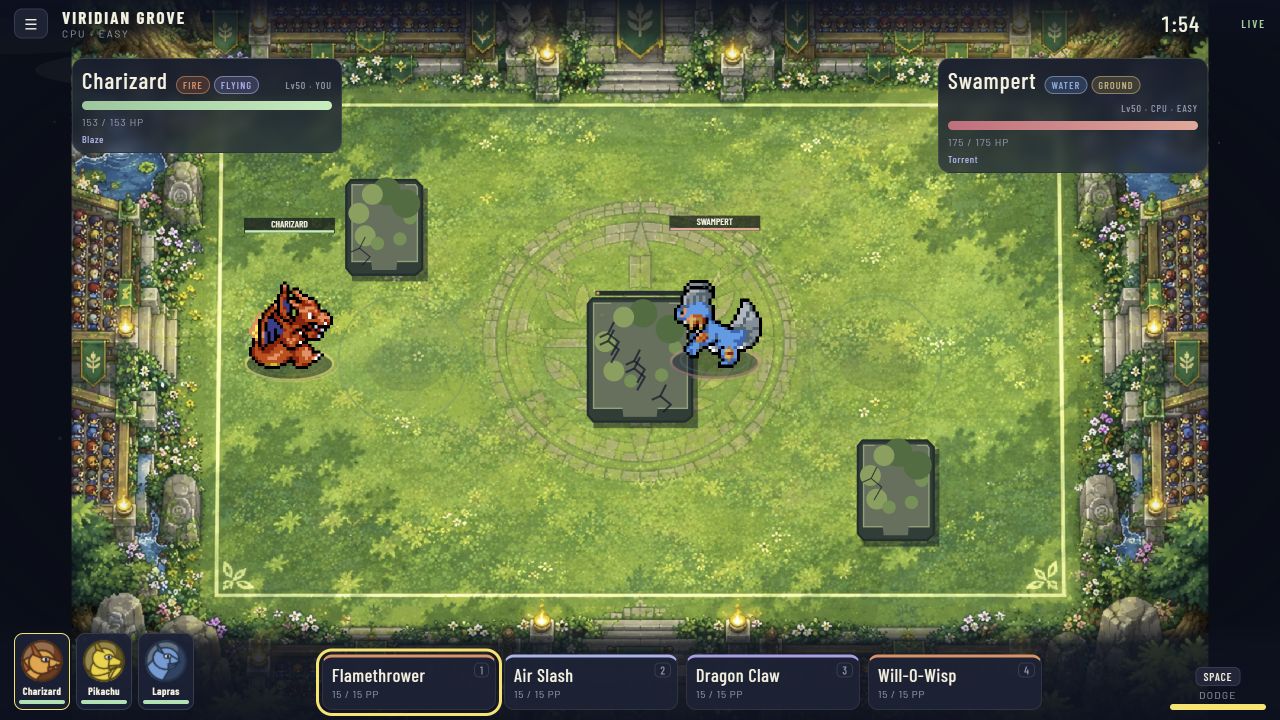
The recorded opening shows Charizard at 153/153 HP and Swampert at 175/175. Swampert's chips read Water/Ground. The lower cards show Flamethrower, Air Slash, Dragon Claw, and Will-O-Wisp, each at 15/15 PP. A central block interrupts the most direct route. This image proves what information the player had before choosing an input; it does not establish which move would have won the exchange.
Use this frame to rehearse a real decision. First, reject a straight shot through the central block. Walk toward one edge until you can see an open lane, then make the final movement input face the target. Next, inspect the card you intend to use and the Water/Ground typing. Fire one move, watch its path, and compare the opponent's HP and your PP. If the attack hits cover, your next change is the angle. If it reaches Swampert but appears ineffective, review type and move behavior. Do not change your teammate, move, and route simultaneously; you would not know which change mattered.
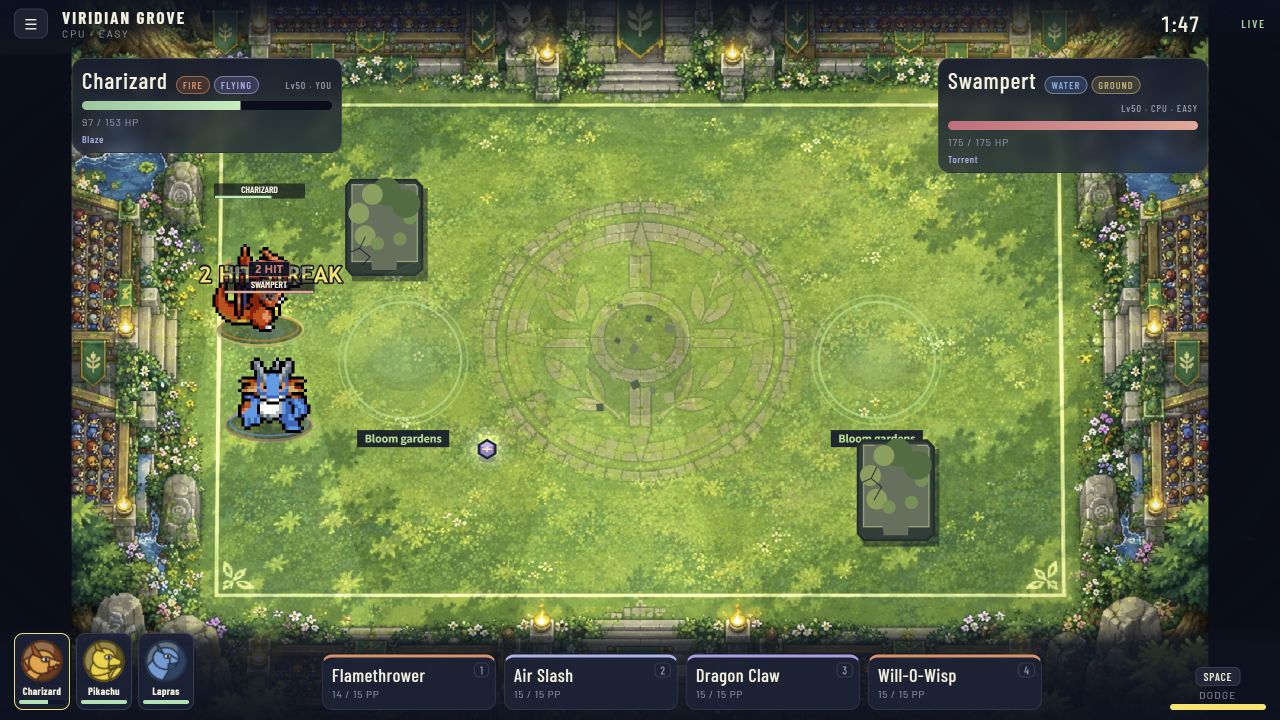
In the later capture, Flamethrower reads 14/15 PP, Charizard reads 97/153 HP, Swampert still reads 175/175 HP, and the center block has disappeared. This is a reason to reassess, not proof of one particular mistake. The shot may have met cover, missed a moving target, or produced another interaction the still frame cannot show. The new open center may offer a route for your next attack and for the opponent's next attack. Check both directions before firing again.
Screenshot case: Pikachu is not a free answer to Water/Ground
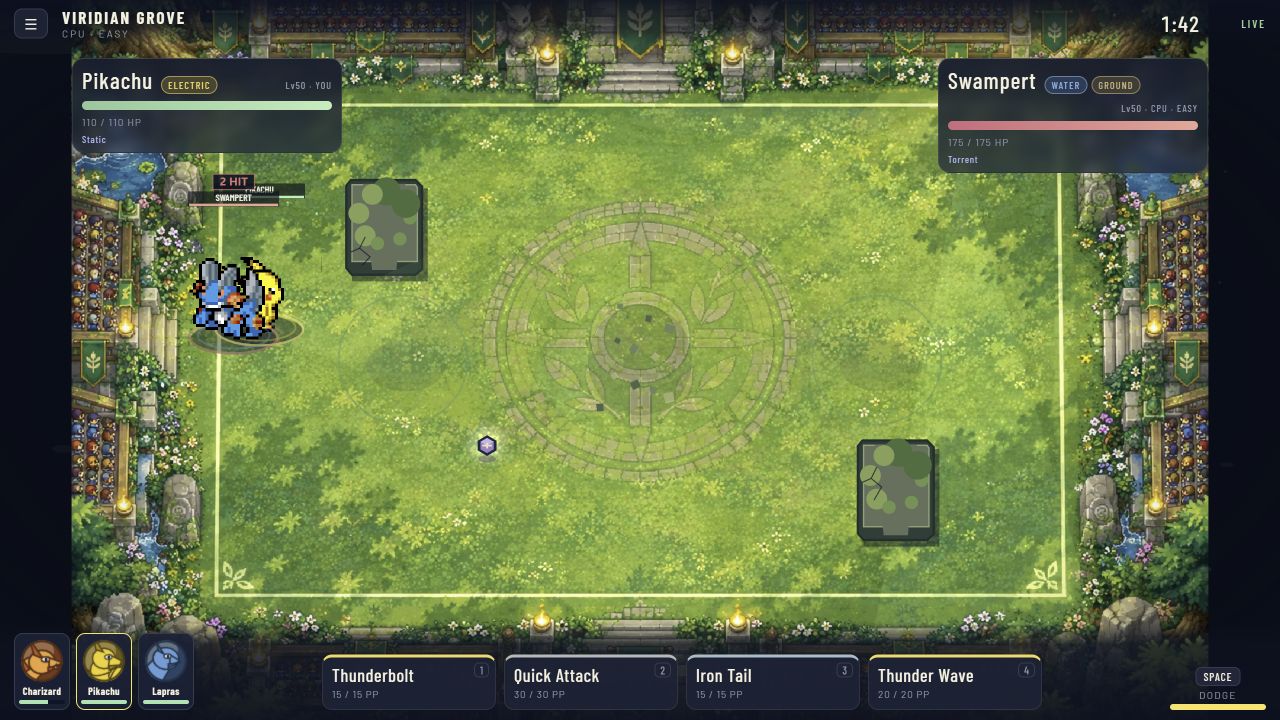
The switch capture shows Pikachu active against the same Water/Ground Swampert. Water alone might suggest an Electric attack, but Ground nullifies Electric damage. Thunderbolt is therefore a poor damage choice here. Read the types of the other available cards or consider a teammate with a more useful attack and a safer position. A type icon on the opponent is only half the matchup; the second icon can reverse your first instinct.
This example also shows why switching requires a fresh HUD scan. Pikachu's four cards differ from Charizard's, and a familiar number key now triggers a different move. After pressing Q or E, read the new active portrait, health, four cards, and PP before attacking. If the opponent is already pressuring the arrival point, move or defend first. A switch solves a problem only when the incoming fighter can act from the position it receives.
A five-minute move lab you can repeat
Choose Quick Battle on Easy. Keep the same trio and arena for two rounds, and use a fighter whose first move you can recognize visually. The goal is to learn one move's usable distance and one reliable response when it fails.
- Round one, open lane: face the target with a short step and use the move once at a comfortable distance. Record whether the effect traveled toward the intended point, reached the target area, changed HP, or struck cover. Do not judge the move only by the match result.
- Round one, blocked lane: stand where a block interrupts the route and observe whether the same move hits the block or requires a different path. Move around one edge before the next attempt. This comparison teaches the geometry of that move in this arena.
- Round two, moving target: wait for the opponent to commit to a route or attack, then try the same move from a shorter distance. If it connects more often, range and travel time were likely part of the problem; if it still fails, inspect facing and type before drawing a conclusion.
- After one switch: read all four new cards and use one clearly different shape. Compare its reach and risk with the first fighter's move. Stop the test if the incoming fighter is under immediate pressure; surviving to observe is more useful than forcing the exercise.
Write one sentence after the two rounds: “When I used move from position, the visible result was result; next time I will change one action.” This gives you a move note you can actually use in Story Mode. Repeat the test on a second arena only after the first result is clear, because cover changes the answer.
When the move key seems broken
Check the simplest causes before changing settings. Is the game frame focused? Does the move card have PP? Is its cooldown finished? Are you still in the recovery of another action? Did switching replace the card assigned to that key? The source game lets you click a move card, so that can help distinguish a keyboard focus problem from a move availability problem. If the input works but no damage appears, return to the type and cover checks above. The combat guide has a shorter failure checklist; the practice lab turns the diagnosis into repeatable drills.
This guide uses the original game's rules and move-family overview checked November 11, 2026, and this site's live-game screenshots captured October 19, 2026. Tactical routes are tests for the reader to perform, not measured hit rates or guaranteed counters.